


Modern development platforms require tools that allow developers to easily create, share and consume useful libraries of code. Depending on the development technology, we can find different types of library management systems. For example, Maven in the Java world, NPM for JavaScript/TypeScript, PIP for Python, etc. In .NET world, the package manager is called Nuget.
But what is a Nuget package? Roughly speaking, it is a zip file which contains the compiled libraries (dlls) alog with other files related to that code, and a descriptive manifest that includes information like the package’s version number.
The following picture depicts the lifecycle of a nuget package: (1) the creator builds the code and packs it as a nuget package. 82) It is then published to a nuget server visible to a consumer, who (3) downloads the package and uses it with its own code.
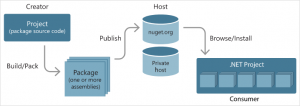
The rest of this article will focus on steps 1 and 2 steps, introducing tools and best practices based on:
- Source code management with Git
- Code development workflows using Git-Flow
- Cloud hosting and continuous integration with Bitbucket
Whas is Git?
Git is a distributed version control system for tracking changes in documents and files, with the ability to coordinate changes on those files among different people. The main element in Git is the repository, which contains information about all the tracked documents and their history since the creation of the repository. The coolest feature of Git is that it is a distributed repository, that is, each time a developer clones a repository, it is actually copying all the data contained in it. Other versioning systems basically download just the snapshot of the code at a specific point in time.
Git uses a branching system which allows multiple parallel local branches completely independent from one another. A branch can be seen as an independent line of development with its own history. Each branch allows several operations, such as creating new branches from a specific point of development, merge branches into a sigle one, etc. This branch-based model allows multiple workflows, since each developer is free to create and handle branches. However, for fast software delivery, this can be an inconvenient, as developers could change in parallel changes to the code that conflict with each other, or make the code fail. Some general workflows are discussed here.
Why Git-Flow?
As Git is a distributed version control system, a great number of workflows can be implemented with ease. This article discusses a few ones, but focusing on repository clones and how they synchronize. However, they do not really specify a branching model that can be followed by developers. That’s where GitFlow enters in the game. Git-Flow is a set of best practices which define high-level repository operations for Vincent Driessen’s branching model.
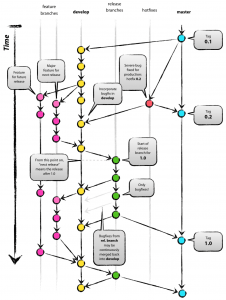
This model (as shown in the picture), defines two main branches with an infinite lifetime:
- master: the main branch where the code always reflects a production-ready state.
- develop: the main branch where the code always reflects a state with the latest delivered development changes for the next release.
When the code in develop reaches a stable point and is ready to be released, all all of the changes should be merged back into master somehow and then tagged with a release number.
Appart from these infinite branches, this model defines three types of supporting branches, which have a limited life time, since they will be removed/merged eventually. These are:
Feature branches
It is a branch which originates from develop and must merge back to develop. They are used to develop new features for a future release. Those features will be then merged backed to develop when finished, or discarded if the are no longer required.
Release branches
It originates from develop and must merge to both master and develop. Release branches are a support preparation for a new production release, where unit/integration tests are done, minor bug fixes solved and documentation completed.
Hotfix branches
Hotfix branches originate in master and merge to both master and develop. They are similar to release branches, but in contrast to them, a hotfix is an unplanned releases that arise from the necessity of immediately fixing a critical bug in the production version.
Why Bitbucket?
As mentioned before, Git is a distributed version control system, in which multiple clones of a repo may exist. When a project involves several developers, it is required that collaboration workflow is defined. The most common one is a central repository from which clones are generated, which also handles synchronization between them. This central repository must be reachable for all collaborators, what can be tricky when they belong to different organizations or, as in open source projects, they are initiated by individuals with no infrastrucre to host them.
That is where cloud-based Git services enter the arena. There are an increasing number of cloud-based hosting services, being Github and Bitbucket the most popular. Both are similar in features and are designed as integrated development tools providing, apart from the source code repository, additional functionalities such as issue tracking, wiki, statistics, branch access control, etc.
The coolest feature of both is the ability to integrate with external systems through webhooks, that is, each time an operation is done on the repository (e.g., pushing code to a branch), the external system subscribed to this repository is notified and it can perform specific operations. An example of this is continuous integration: Github integrates with an external continuos integration system, Travis-ci, which is able to checkout a branch and run all tests defined and perform specific actions denpending on the outcome; Bitbucket directly provides a similar feature called pipelines, which launches a Docker container that will execute a set of predefined actions. These pipelines can be customized for each branch and configured to perform specific steps, which run one after each other until all complete or one of them fail.
Putting all together
Going back to the title of this article, our main goal is to create a Nuget package and publish it to a Nuget repository, making use of the tools and best practices explained below.
We will assume that there is a central repository hosted in Bitbucket and each developer is cloning that repo in their local machines. These developers will be following the GitFlow branching model to implement new features and planning releases/hotfixes. Between all developers, one will be designated as the integration manager. The role of the integration manager is to plan releases and merge changes into the master branch. That means that the master branch is write restricted to just the integration manager. This can be achieved in Bitbucket by setting branch permissions.
We will then configure pipelines to peform the following actions:
- If pushing code to develop branch:
- Install a docker image containing the .Net sdk. The basic one provided by Bitbucker is microsoft/dotnet:sdk
- Build the project using the compiler provided in the sdk and the ‘debug’ build configuration
- Run all test cases
- If pushing code to master:
- Install the docker image with the .Net sdk
- Compile the code using the ‘release’ configuration
- Run all test cases
- Optionally, build documentation.
- Any push to other branches won’t trigger any pipeline, as they potentially contain unstable code that may fail tests.
The packaging and publishing of the Nuget package could be added as another step in the master branch pipeline, but is is better to set it up as a manually triggered pipeline, that is, someone needs to explicitely invoke this operation. The reason to do so is to avoid publishing unwanted versions to a public repository or, decide whether to publish it on a public repo or in a private one. Therefore, the manual pipeline would contain the following steps:
- When invoked:
- Install the docker image with the .Net sdk
- Check that the pipeline is invoked at the master branch
- Compile the code using the ‘release’ configuration
- Pack the libraries using the sdk utilities
- Build documentation.
- Publish the generated package to the nuget server.
- Optionally, build documentation and publish it to a website.
If we are publishing to the official Nuget repository, we will need to register there and obtain a package specific key, that allows you to publish new versions of that package. That key can be stored as an environment variable in Bitbucket, preventing it from being hardcoded in the pipeline configuration file.
Finally, this is the skeleton of the pipeline used to perform all the steps explained:
# Check our guides at https://confluence.atlassian.com/x/5Q4SMw for more examples.
# Only use spaces to indent your .yml configuration.
# -----
# You can specify a custom docker image from Docker Hub as your build environment.
image: microsoft/dotnet:sdk

pipelines:
  branches:
    '{master,develop}': # Only on master and develop
     - step:
        caches:
          - dotnetcore
        script: # Modify the commands below to build your repository.
          - export PROJECT_NAME=my_project # This is the project with your source code
          - export TEST_NAME=my_test_project # this is the project with test cases
          - dotnet restore
          - dotnet build $PROJECT_NAME
          - dotnet test $TEST_NAME
  custom:
    nuget:
    - step:
       script:
        - echo $BITBUCKET_BRANCH
        - test "$BITBUCKET_BRANCH" = "master" #if not in master, pipeline will fail here
    - step:
       caches:
          - dotnetcore
       script: # Modify the commands below to build your repository.
          - export PROJECT_NAME=my_project
          - export BUILD_CONFIGURATION=Release
          - dotnet restore
          - dotnet build $PROJECT_NAME -c $BUILD_CONFIGURATION
          - cd $PROJECT_NAME
          - "for file in bin/${BUILD_CONFIGURATION}/*.nupkg; do dotnet nuget push $file -k $NUGET_KEY -s nuget.org; done"